Microsoft Cognitive Services – Getting Started
Along with other big names such as Google and Amazon, Microsoft has launched its own brand of machine learning SaaS – called Cognitive Services. While limited in its current offerings, the service provides a simple, easy way to start integrating machine learning into your applications.
This post will provide steps on getting access to cognitive services and getting a feel for interfacing with the services using Postman. Subsequent posts will provide all of steps necessary for integrating cognitive services into an application. These steps are:
- Sign up for Cognitive Services
- Select services you want to access
- Retrieve your subscription key
- Install Postman
- Find a picture you want to have processed
- POST to the service
- Interpret the results
Not surprisingly you will need to create a Microsoft login to get access to these services – not painful, and it only takes a couple of minutes. Use this link to sign up.
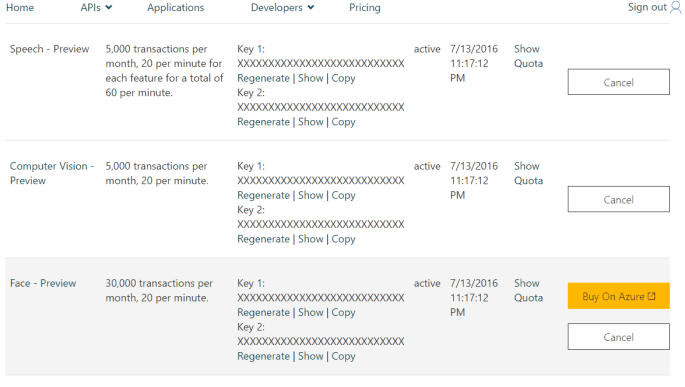
Once completed you will be prompted to select which services you want access to – for the purposes of this tutorial, check “Computer Vision – Preview” (figure 1). Then navigate to the subscriptions screen to get your API key. Show and grab your key for “Computer Vision – Preview”.
Postman is a simple, straightforward Chrome application for executing calls against HTTP endpoints and it allows us to easily set the required headers for calling the cognitive services API.
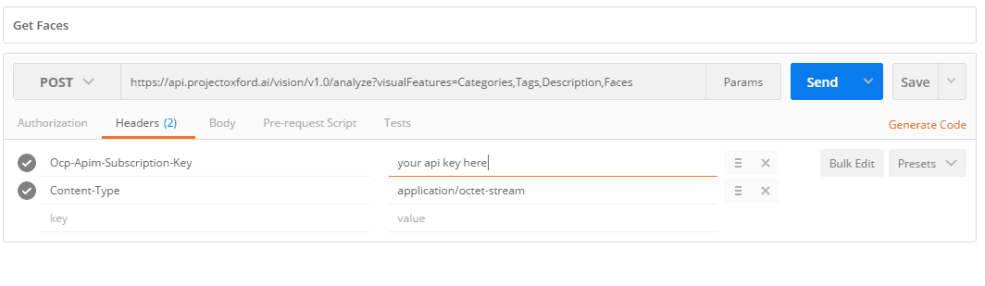
Once Postman is installed, open it to the main screen (you don’t need to create a login, etc. for this tutorial). We need to set 4 things to successfully make the request:
- The URL for the POST command
- The “Ocp-Apim-Subscription-Key” header – which is the API key you grabbed earlier
- The “Content-Type” header to “application/octet-stream”
- The image that you want processed by cognitive services
The URL provides the means to indicate the type of information that should be returned from the service. For our purposes, we will stick with Categories (very high-level categories of what the image contains), Tags (a more detailed list of words related to the image), Description (full sentences/captions of what is in the image), and Faces (probably the most interesting part – it returns an array of objects for each face identified in the image – each object contains information on the age, gender, and top, left, width, and height of a box around the face that the object pertains to) . Full details on the parameters and what is returned can be found here; consequently, our URL for the POST is:
https://api.projectoxford.ai/vision/v1.0/analyze?visualFeatures=Categories,Tags,Description,Faces
Your Postman headers tab should look like this (note that a POST is being made):
 Your Postman body tab should look like this (note that binary has been selected as the format):

The last thing to do is to use the “Choose Files” button on the body tab to select the file to send to the service. Please note that images have to be JPEG, PNG, GIF, or BMP, less than 4MB, and at least 50×50. Once you click send, you should see a response similar to this:

As discussed earlier, the results returned are based on the parameters in the query string. From a machine learning perspective, the most interesting data returned are values indicated as “confidence” for items such as “captions”, and “tags” which are between 0 and 1 indicating the level of confidence of the prediction (1 meaning 100% confidence, 0 meaning 0% confidence).
In the next post we will be integrating, this service into an Ionic 2 application.


