Your First Step Into Data Science: Getting Set Up In 15 Minutes
One of the most frustrating and confusing parts of getting started in Data Science is getting your machine set up. With the steps outlined here, you can have a Python environment set up and running in less than 15 minutes.
Here are the steps to get your machine set up for Data Science:
- Install Python
- Install Anaconda
- Create an Environment
- Activate the Environment
- Install Packages
- Write and Run Your Code
Install Python
This is fairly straightforward – go to the Python site and follow the steps there to install the latest version of Python for your operating system.
Install Anaconda
Installing Anaconda is just as simple; go to the Anaconda site and install the latest version. Please note that you should install the free “full” version of Anaconda and not Miniconda.
For Linux, you will have an additional step as the Anaconda folder isn’t added to your $PATH in your user profile and also add the “conda activate” command. Run these commands to add the necessary information to your profile (remember to replace <your user name> with your current, logged in username):
echo "source /home/<your user name>/anaconda3/etc/profile.d/conda.sh" >> ~/.bashrc
echo "conda activate" >> ~/.bashrc
source ~/.bashrc
Note: on some flavors of Linux, you may still need to “source” your bash profile to make the “conda” command available. To do that just execute:
source ~/.bashrc
Create an Environment
With Anaconda installed, we can now use “environments” for installing the various packages we will use for our Data Science projects. An environment provides us with a way to isolate the installation of specific versions of language runtimes and packages. For example, you can create one environment for working with Python 2.x projects and another for Python 3.x projects without one interfering with the other.
On Windows, you will need to open a special “conda prompt”:
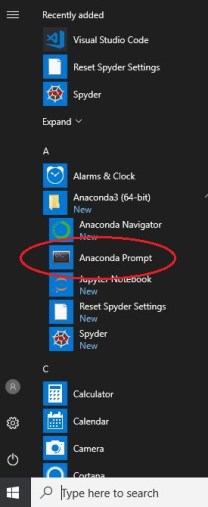
Windows Conda Prompt
Then, on Windows, Mac OS, and Linux enter:
conda create --name ccenv python=3.6
Using this command is the easiest way to create an environment with a version of Python that will work well with the packages that we are installing next. If you want your environment to have a different name just change “ccenv” to something else. Similarly, just change the version of Python to fit your needs.
Please note that for Windows you will always need to use the special “conda prompt” when executing any of these commands.
Activate the Environment
In order to use the new environment, we need to activate it.
On the Mac command line enter:
source activate ccenv
On Windows and Linux execute this command:
conda activate ccenv
Now that have activated the environment, we should see the name of our current environment at the front of the command prompt:
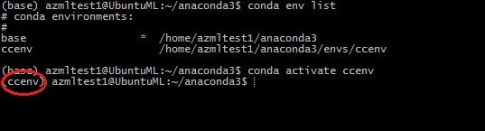
Current Conda Environment
Having the current environment displayed like this is extremely useful. It allows us to know exactly which environment we are working in as our list of environments grows over time.
Installing Packages
Next, we need to install the packages that we will be using for our projects. For Mac OS, Windows, and Linux, in a command prompt that is showing that you are in your new environment, enter this command:
conda install scikit-learn scipy pandas numpy matplotlib jupyter
If you are on Mac OS and you see errors with a message about “widgetsnbextension”, you will need to execute an additional command to install that library. Sometimes you will find that a package isn’t available through Anaconda, as is the case here, so we can just use another installer called “pip” to get it installed.
pip install widgetsnbextension
Write and Run Your Code
Now everything should be set up, so let’s write some code to confirm that everything is working properly.
At a command prompt, with your new environment showing, enter these commands (hitting enter/return after each line – the “python” command will start the interpreter for running the code):
python
import numpy as np
data1 = np.array([1, 2, 3])
data2 = np.array([[3, 4, 5], [5, 10, 15]])
np.matmul(data1,data2.T)
If you’re not clear on running these commands, use this screenshot as a reference:

First Code
Congratulations on taking your first, big step into Data Science! BTW, whether you realize it or not, this code performs matrix multiplication which is the foundation for much of machine and deep learning!
If you did run into issues during this process please go through the steps outlined above again to ensure that you haven’t missed any of the steps. If you missed even one step from above you will encounter problems when running this code. Linux can be particularly finicky as all of the different “flavors” can be a little different when it comes to installation, setup, and configuration.
Also, if you do encounter any issues or confusion with the instructions we provided in this post please leave a comment or suggestion below so that we can work to improve it.
A Couple of Final Things…
We love the command line for simple tasks, but for really getting work done in Python (and other languages) we highly recommend using VS Code; however, getting it set up to use your conda environment can be tricky. Follow the steps on our post to get everything set up and working quickly and easily.
While we love Anaconda, but it has a nasty tendency to large, unused files on your machine that just take up space. To help free up that space follow our tutorial here on running conda’s clean command.
Subscribe to our email to ensure that you get notified when we post more tutorials that will help you on your incredible journey into Data Science. This post is the first in a series of posts designed to take someone who is completely new to Data Science from the basics all the way up to becoming an expert.
Here are some of the topics we will be covering:
- Introduction to Jupyter Notebooks
- Getting Started with Pandas
- Introduction to Numpy and Matrix Math
- Creating Your First Machine Learning Model
- Deep Learning with Keras and TensorFlow
- Creating Your First Convolutional Neural Network
- Computer Vision with OpenCV
- Apply Machine Learning to Real-Time Streaming Data Using Spark
- Working with Time-Series Data
- Getting Started with PyTorch
- And many more on our “todo list”!


